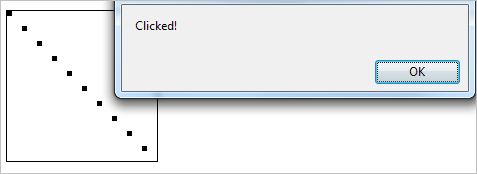
The canvas element allows us to create rich, dynamic, custom drawn web displays such as this:
A common requirement when drawing custom user interfaces is likely to be that users will want to be able to interact with the display via mouseover or clicking actions. That is not something that is provided out of the box with the canvas element.
For example, when displaying a custom-drawn statistics chart on a canvas, the user might like to get additional information via a pop-up dialog when they place their mouse over certain parts. This is common in rich info-graphic displays.
To include this functionality requires custom positional logic to be run to ascertain whether the location of the mouse event intersects with the location of an underlying piece of rendered drawing. This is commonly referred to as "hit test" logic.
To get started, you need to store positional information about any rendered objects that you want to be able to detect. That is, if you draw a circle on the canvas, you will need to store the position of that circle in your code. To demonstrate this, let's look at the code used for displaying those rectangles in the image shown above.
First, let's add a canvas to our HTML page like so:
Then we add the code that is responsible for displaying the rectangles and storing their positional information in memory.<canvas id="board" width="150" height="150"></canvas>
function Item(left, top, width, height) {
    this.Left = left;
    this.Top = top;
    this.Width = width;
    this.Height = height;
}

var items = [];

for (var i = 0; i <= 150; i += 15) {
    var item = new Item(i, i, 5, 5);
    items.push(item);
    Draw(item);
};

function Draw(item) {
    var canvas = document.getElementById('board');
    if (canvas.getContext) {
        var ctx = canvas.getContext('2d');
        ctx.fillRect(item.Left, item.Top, item.Width, item.Height); // x, y, width, height
    }
}Next, we need to hook up an event handler to an event. For this demo I will wire up a handler to the mouse-click event of the canvas object itself. Here is the code for that event handler with the contained logic for performing the hit test:
$('#board').click(function (e) {
    var x = e.pageX - this.offsetLeft;
    var y = e.pageY - this.offsetTop;
    var clicked = new Item(x, y, 1, 1);
    var pos = getPositions(clicked);

    for (var i = 0; i < items.length; i++) {
        var pos2 = getPositions(items[i]);
        var horizontalMatch = comparePositions(pos[0], pos2[0]);
        var verticalMatch = comparePositions(pos[1], pos2[1]);
        if (horizontalMatch && verticalMatch) {
            alert("Clicked!");
        }
    }
});canvas and not of the page - e.g. 0,0 would be the extreme top-left of the canvas.
Before showing the two helper functions - getPositions and comparePositions - I will explain the simple process that we go through to determine if the positions intersect. Take a look at the two rectangles in the following diagram:
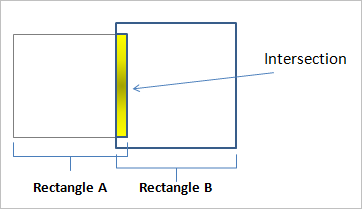
Here we can see that there is indeed an intersection point between these two rectangles. The code that will be used to determine this can be seen below, and I grabbed this code from here.
function getPositions(item) {
    return [[item.Left, item.Left + item.Width], [item.Top, item.Top + item.Height]];
}

function comparePositions(p1, p2) {
    var x1 = p1[0] < p2[0] ? p1 : p2;
    var x2 = p1[0] < p2[0] ? p2 : p1;
    return x1[1] > x2[0] || x1[0] === x2[0] ? true : false;
}This article has shown a very simple method for doing a hit test on a custom drawn object. In following articles, I will show how to cater for more complex scenarios where you might want the user to be able to interact with the underlying drawn object - e.g. handle a mouse-click to display a dialog that allows the user to select a new property for a certain facet of the underlying object such as the size of the object, or it's color.
No comments:
Post a Comment