Monday, February 1, 2016

Have the ability to rapidly build and run micro-applications

All life is an experiment. The more experiments you make the better.
- Ralph Waldo Emerson

I'm in the process of developing my own application 'stack' (generic application slices with reusable cross-cutting concerns - e.g. Security, Configuration, and Logging).

I have most of it in place at the moment, but still need to work out how I will secure my API's.  Presently, I am looking at IdentityServer as a possible solution for this.

This is the sort of solution that I want to be able to design/develop/build/package/release quickly:

* Web API Service Bus
* Typescript Client
* Identity Management Server (this probably only needs to be build and deployed once)

I have lots of little ideas that I want to be able to push out and host as an Azure AppService.  One of them is a Garden Maintenance Planning application, another one is a Habit Kicker service.
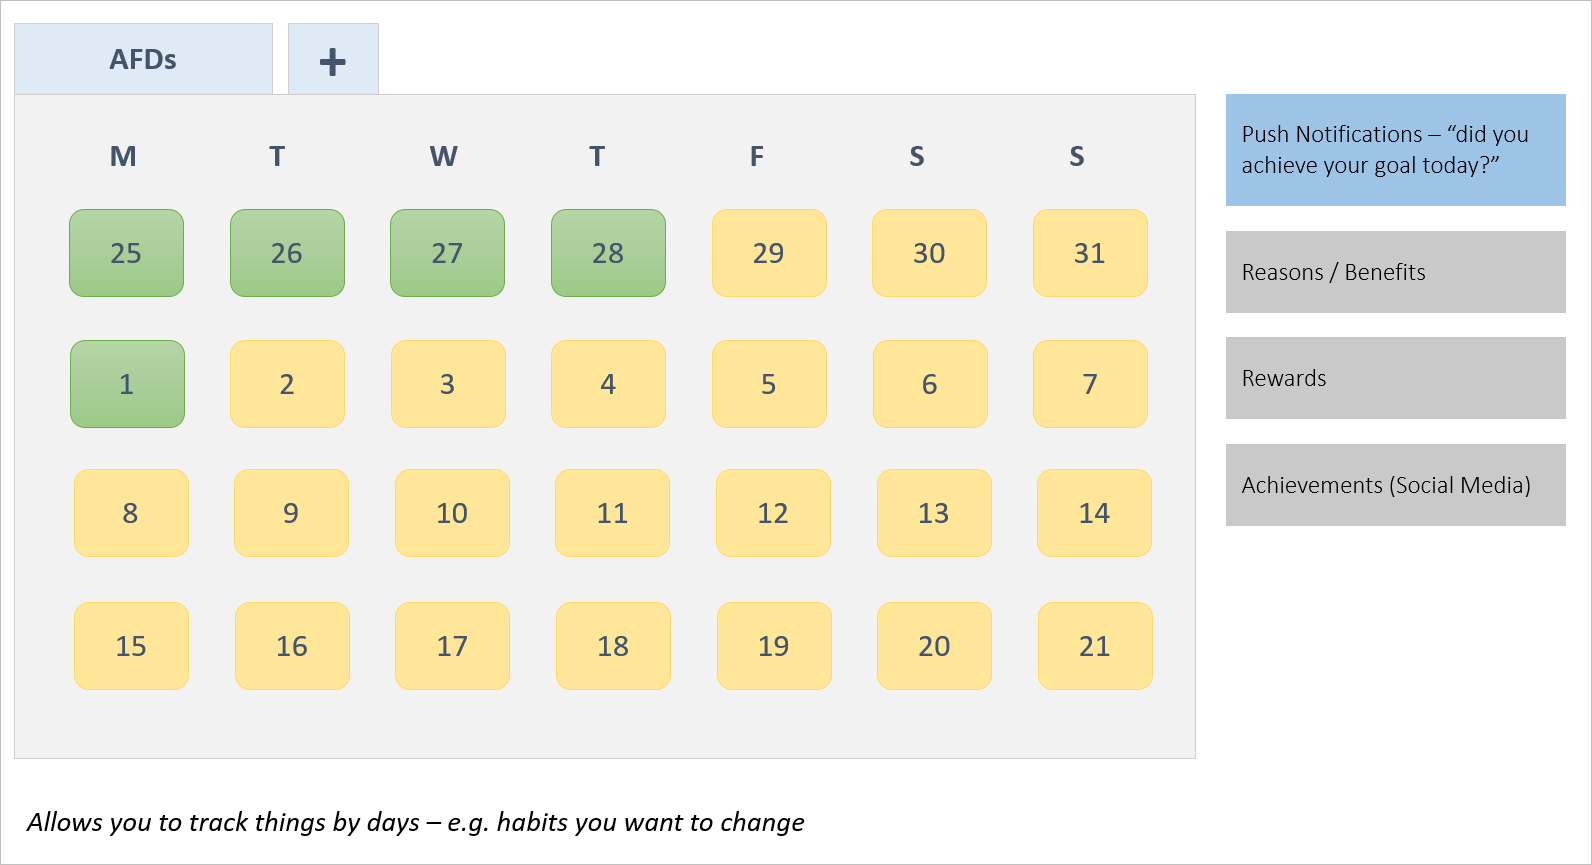


The Habit Kicker application let's you create a habit that you want to kick - in my case, I am aiming to have alcohol free days (AFD's) and then record success outcomes.  The system will push out an alert asking for feedback about whether you have achieved your goal for the day.

You can see from the user interface that, even for such a simple little idea, there are many problems to be solved:
  • How will notifications be implemented
  • How will schedules be implemented
  • What technologies will be used to develop the user interface
  • How are users identified
For these types of micro-applications, it would be desirable to have a consistent, repeatable recipe for build/package/release that would scale across the different application types - e.g. Typescript client, DNX Web application, ASP.NET 4.6.

Being able to create the infrastructure components and deployment pipeline rapidly, means that you can focus on developing value from as early in Sprint 1 as possible.

In terms of infrastructure, my plan is to use Visual Studio Team Services for source code hosting, and for Build/Package/Release.  Using Azure AppServices as my hosting platform provides me with a high level of control and flexibility.  Azure AppServices also have useful platform components such as WebJobs that I can take advantage of.

The next major problems that I want to solve are:


  1. Identity and Access Management - I want a low touch solution that is as decoupled from my Application as possible
  2. Build/Package/Release - recipes for different flavors of app, as mentioned above

Please feel free to leave any tips or comments to let me know how you achieve rapid deployment for your little ideas.


Relevant posts

Wednesday, January 27, 2016

Configuring .NET Core projects for optimal local development

When developing an ASP.NET Core applications, among other decisions, you need to choose which version of the ASP.NET Core and .NET Core packages to consume. When using .NET Core tooling in its default state, you will likely bump against the following issues when developing many projects locally:

  1. The default Nuget settings are a global configuration (%AppData%\NuGet\NuGet.config).   How do different developers keep their Nuget package source configurations in sync if they are not in source control?
  2. The default package source folder is a global setting (%userprofile%\.dnx\packages).  How can you run separate projects against a different .NET Core package versions without getting version conflicts for packages?

Choosing a .NET Core version for your solution

ASP.NET Core source code is developed on GitHub and then pushed to several different Nuget feeds, based on the stability of the code.  The cadence and feed choices are as follows:

  • aspnetvolatiledev – Any package that compiles is pushed here. Only used by contributors dealing with breaking changes between repos.
  • aspnetcidev – A coherent set of packages that compiled referencing eachother. Used by contributors when building under normal circumstances.
  • aspnetvnext – A coherent set of signed packages that have passed automated testing. Used by consumers evaluating the latest developments in the stack.
  • Nuget.org – Official releases used by general consumers.

The choice will depend on your appetite for risk/change/stability.  Choosing the Nuget.org release means that your packages will be very stable for a long period (e.g. Beta 5, Beta 6, RC1, RC2, etc.) but you will have a lot of catching up to do when new packages are released due to the high amount of code and API churn that is happening at the moment.

In choosing the ASPNETCIDev feed you will avoid monolithic refactors but, instead, you will get hit with regular breaking changes that will impact your development productivity on a daily basis.  

The vNext feed sits between the official feed and the CIDev feed and provides a trade-off between daily breaking changes or a monolithic set of changes.

Restoring Packages

.NET Core projects define their dependencies in global.json and project.json files.  Global.json identifies the platform version dependency while project.json specifies individual package dependencies.  After you have configured these files in your project, it is simply a matter of running the dotnet CLI tool to restore packages from the feed source to your local machine.  


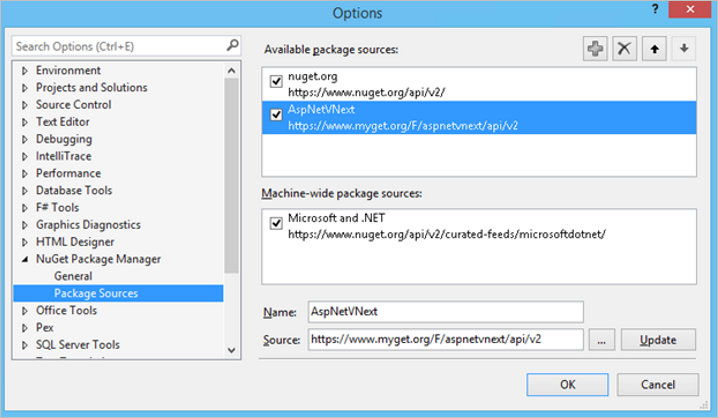
The dotnet restore command uses Nuget configuration to identify which feeds to use when restoring.  The user profile defaults for Nuget are located at %AppData%\NuGet\NuGet.config.  These defaults are updated when you manage package sources via the Nuget configuration tool in Visual Studio.

To add the vNext feed source to your defaults, open the configuration tool and add an entry to the MyGet feed


Configuring per-project settings

Developers should have the best F5 experience possible - which means they should be able to checkout source code and run it without any friction.  Thankfully we can enable this by configuring settings on a per-project basis.

The dotnet restore command will look for and load a local project Nuget configuration before it loads the global configuration from the user profile.

Similarly, command will look for a packages setting in the global.json solution configuration to identify where to locate restored packages before defaulting to %userprofile%\.dnx\packages.


My configuration

The following files explain my personal configuration for local projects to achieve projects that are self-describing of their dependencies and which assist with reducing developer friction.

The first task is to create a local Nuget.config in the root folder of your solution.

The first line of the Nuget.config clears any package sources that might be configured at another level - e.g. the global user setting. This ensures that the local Nuget.config, defines all sources that are relevant for the project and that these are checked in to version control with the rest of the source code.

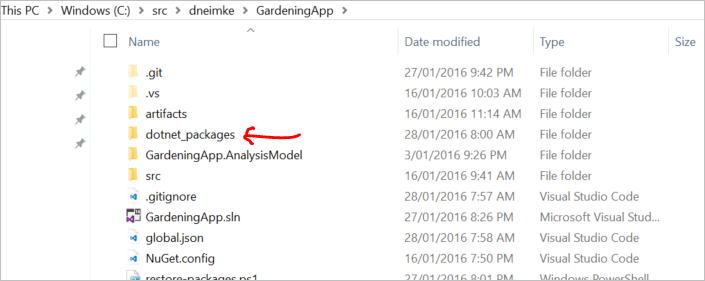
Next step is to configure a separate location for packages that are restored for the project. This ensures that the project is not impacted by other packages that might exist in the global package store which might have come from a feed which is running at a different cadence to the local project.

At this point, running the dotnet restore command will restore all dependency packages from the vNext feed into a local packages folder in the root folder of the solution.


The final step is to configure Git so that the packages folder is excluded from version control.  This is simply a matter of adding a line to the local .gitignore file for the solution.


Tuesday, January 12, 2016

Bootstrap tasks for new Typescript web projects

Earlier this year, after attending a Microsoft conference, I blogged how the momentum of the developer workflow is moving rapidly towards running tasks from the command line.  Since then I have continued to develop skills and knowledge in this area.

This post is a walk-through of my current workflow for bootstrapping new Typescript web projects for development using VS Code.  The high level tasks I execute are:

  1. Create a root folder for the application
  2. Acquire development tools using NPM
  3. Acquire software framework dependencies using Bower
  4. Create the VS Code project definition 
  5. Start the application and launch it in a browser
  6. Add the project assets to source control

Step 1. Create the project Root Folder

A straightforward step.  You could open Windows Explorer and browse to your root working location and create a new folder.  However, as we are going to be working inside of the command shell, we can avoid the friction of opening Explorer by running DOS commands.

NOTE: Since moving to the command line for my workflow, I have leaned more and more on ConEmu as my tool of choice for running command line tasks as it is only ever a keystroke away.

I launch ConEmu (CTRL+~) and type:

> cd \code
> md myproject
> cd myproject

That gets me a new project folder named myproject in my development working folder and places the location of my command prompt in the new folder.

Step 2. Acquire Development Tools

For the purpose of my bootstrapping I grab the following development tools:
  • Typescript: The tsc compiler will compile our Typescript to Javascript
  • Bower: package manager for managing client side dependencies such as Bootstrap and Angular
  • Browser Sync: Use to serve the app and to provide live updates in the browser during development
Command line tasks for installing development tools using npm:


Running these commands creates a package.json folder that contains the node configuration information.  It also creates a node_modules folder where the packages that get downloaded are stored.

NOTE: Later the node_modules folder is excluded from source control as the packages can be pulled down on demand using the npm install command - typically either on the build server or on another developer machine.

Step 3. Acquire Software Dependency Packages

My standard software frameworks are Bootstrap and Angular so I install them as part of the project setup.  As with npm, the first step is to initialize the folder for bower and then run commands to pull down and install the packages:

bower init
bower install angular --save
bower install bootstrap --save

Step 4. Create the VS Code Project

For this step, launch VS Code from the current folder using the following command:

code .

Note: This assumes that you have VS Code installed on your machine and that it is configured on your PATH variable.

In the root of the project, add a file named app.cmd and add the following command:

browser-sync start --server --port 3001 --index default.html --files="./*"

This command launches the app using a web server.  Browser Sync is a node package that was installed in the tooling step.  It watches files for changes and then refreshes the browser to show the updates.

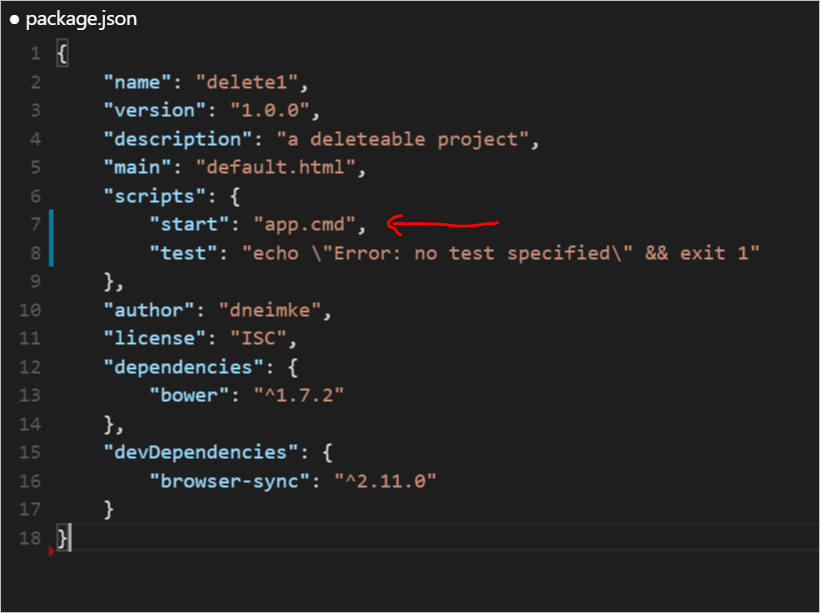
Update the package.json file by configuring the start command to launch the website using the command that was just created.


With this piece of config in place, the site can now be launched in a browser from the command line using either of the following commands:

# launch using npm
> npm start

# launch using app.cmd
> app


NOTE: All of these tasks can be automated using VS Code's task runner but I am not yet as familiar with that task runner as I am with the approach shown in this article. 


Typescript projects require a tsconfig file that defines compiler settings and identifies the Typescript files to be compiled.  Create a file named tsconfig.json in the root of the folder and add the following configuration information.


As the project is developed, files get added to the files element and further compilation options added as necessary.

The project will need a suitable default html file and this is the basic template that I have been using.


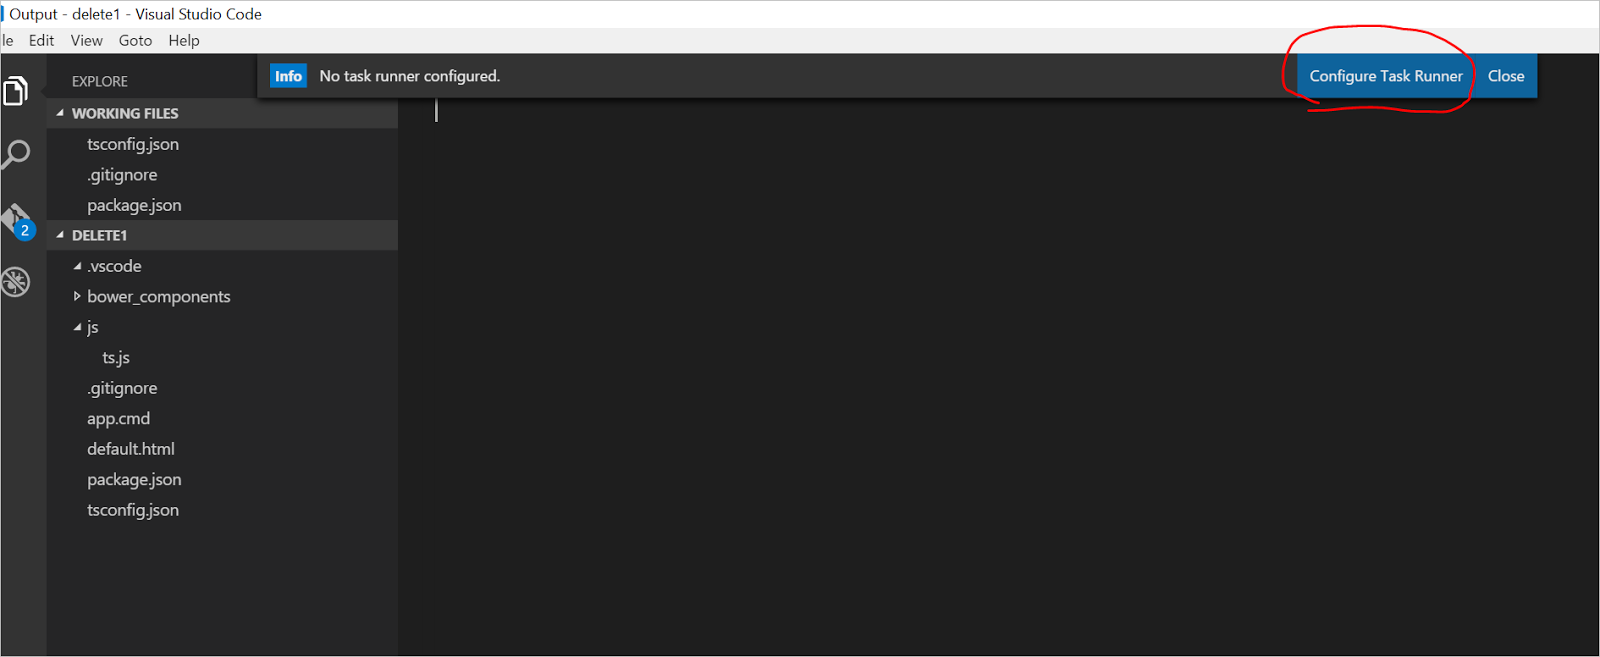
The last task for setting up our VS Code project is to add a build task.  This allows us to press CTRL+SHIFT+B to compile the project.  To create the initial tasks file, press CTRL+SHIFT+B and VS Code will prompt to create the file:


After creating the task runner, overwrite the default content following task definition to compile Typescript assets:


At this point you should be able to press CTRL+SHIFT+B and see that the project builds - later when you have Typescript files, you will see that they get built into the js folder which is what we configured in the compilation options earlier.

You should also be able to run npm start and see the default page load up in a browser.

If that has worked so far... well done!

Step 6.  Add assets to source control

With all of that hard work, the last thing you want is to lose content that has been created.  The final step is to configure Git and commit the project to source control.  To start with, create a Git ignore file to exclude Typescript generated content, and packages.

The file should be named .gitignore and contain the following definition.

NOTE: Read Scott Hanselman's article to learn how to create files that start with a dot in Windows.


With the .gitignore configuration in place, all that is left is to run Git commands to initialise the repository and commit the assets to version control:

> git init
> git add .
> git commit -m "Initial Commit"


Testing Gist embeds in Blogger

Although I've had my blog here for a number of years now, it's largely been inactive.  Now that I've started to stir again, it feels as though there is some unnecessary friction in writing posts simply because I don't enjoy the Blogger platform.

The main gripe I have is the lack of control you have over the HTML that gets generated - it's akin to the old SharePoint platform and what it did to content.

This post is a test post to see how embedded Gists appear in Blogger.

Monday, November 23, 2015

Using Powershell to work with Json

Today I decided to look into working with Json in Powershell.  Json is rapidly overtaking Xml as the preferred format for describing projects and build artifacts, so it makes sense to learn how to integrate it with tools such as AppVeyor scripts, Visual Studio Team Services Build Tasks or Octopus deployment steps.

A quick search online led me to discover the following two Poweshell cmdlets that can be used when working with Json:

• ConvertFrom-Json
• ConvertTo-Json

Using cmder, I created a new Powershell tab and started typing:

> cd \temp
> md jsontests
> new-item "testjson.js"
> notepad "testjson.js"

I then added the following content to the file:

{ 
    Name: "Darren Neimke",
    Age: "42",
    Gender: "Male" 
}

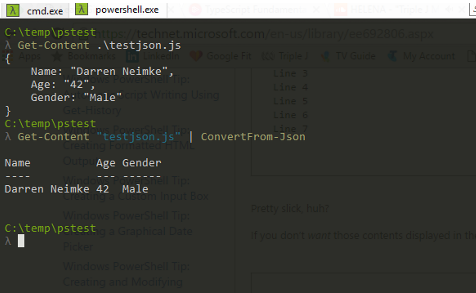
Flicking back to the console, I typed the following Powershell command to confirm that I could read the content:

Get-Content "testjson.js"

Piping the raw content to ConvertFrom-Json produced the following:


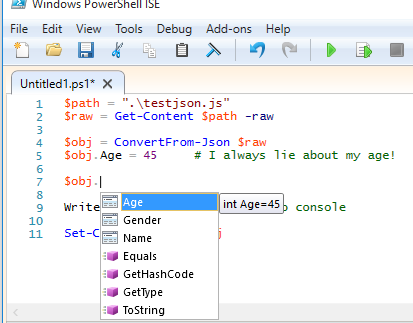
To expand my use of Powershell, I opened the Powershell ISE and created the following script:

$path = ".\testjson.js"
$raw = Get-Content $path -raw

$obj = ConvertFrom-Json $raw
$obj.Age = 45     # I always lie about my age!

Write-Host $obj   # Dump obj to console

Set-Content $path $obj


The ISE amazed me in how it was able to infer the schema of the $obj instance and provided me with Intellisense after that!


Running that script updated the value of the Age property and saved it back to the file.


Things I Learned:

  • Using ISE to create a Powershell script
  • How to pass the content of a file to another cmdlet using piping and variables
  • Updating Json content using variables
  • Saving a file


References:


EntityFramework and the challenge of Entity Serialization

Let's take the following couple of entities:


public class Parent
{
    public int Id { get; set; }

    public string Name { get; set; }

    public List Children { get; set; }
}


public class Child
{
    public int Id { get; set; }

    public string Name { get; set; }

    public int ParentId { get; set;  }

    public Parent Parent { get; set; }
}


And pass them through an Entity Framework query that looks like this:


var parent = db.Parent
                 .Include(par => par.Children)
                 .Where(par => par.Name == "Somename")
                 .FirstOrDefault();

It's interesting to see that we can then write the following LINQ to query the result:


var result = parent.Children[0]
                .Parent.Children[0]
                    .Parent.Children[0]
                        .Parent.Children[0]
                            .Parent.Children[0]
                                .Parent.Children[0]
                                    .Parent.Children[0]
                                        .Parent.Children[0]
                                            .Parent.Children[0]
                                                .Parent;

Here, the result variable refers to a Parent type which will have a collection of Children which will have a Parent ... oh never-mind, I'm sure you see where this ends!

When building a Web API application, we might think of exposing this type of query through a Controller action.  In such a case, how should the serializer deal with the cascading references.

One solution is to use a Serialization solution such as the ReferenceLoopHandler that is found in the Json.Net library to ignore circular references.  This switch tells the serializer to exclude reference properties after they have been found the first time.

Another solution is to shape the data to return specific fields from the service operation.

var parentView = new 
{
    ParentId = parent.Id,
    ParentName = parent.Name,
    ChildCount = parent.Children.Count,
    Children = parent.Children.Select(c =>
            new {
                Id = c.Id,
                Name = c.Name
            }
        )
};


This approach helps to control the shape of the data and to have greater certainty over what is being returned.

Taking this one step further we would create custom Data Contract classes and return those instead of the loosey-goosey approach of returning anonymous types.


var parentDataContract = db.Parent.Include(par => par.Children)
                            .Select(par =>
                                new ParentView
                                {
                                    Id = par.Id,
                                    Name = par.Name,
                                    Children = par.Children.Select(c =>
                                        new ParentView.ChildView
                                        {
                                            Id = c.Id,
                                            Name = c.Name
                                        }
                                    )
                                }
                            );

This approach gives us better static checks across the application, allows for reuse of Data Contracts across separate operations, and allows us to see where different contracts are being used.  From a versioning and maintenance point of view, this would be the gold standard.

What is your approach to designing service endpoints?   Do you mix RESTful with RPC-style design all in the same Controllers or do you separate them out into their own classes of service?

Saturday, November 21, 2015

Developing from the Command Line

As I have mentioned, the developer workflow has changed quite a bit.  In case you haven't heard or kept up, it looks something like this:

  • From the command line, use Yeoman to generate a new project  > yo webapp
  • From the command line, initialize the folder as a new Git repository  > git init
  • From the command line, open the new project using an Editor of your choice  > code .

As you can see, much more is being done from the command line.  New tools such as cmder are being used to gain quick access to command windows for Powershell/Node/etc to assist and speed up this flow.  Cmder is great because it has transparency, allows you to have multiple tabs, and is easily summoned and hidden away using CTRL+`.


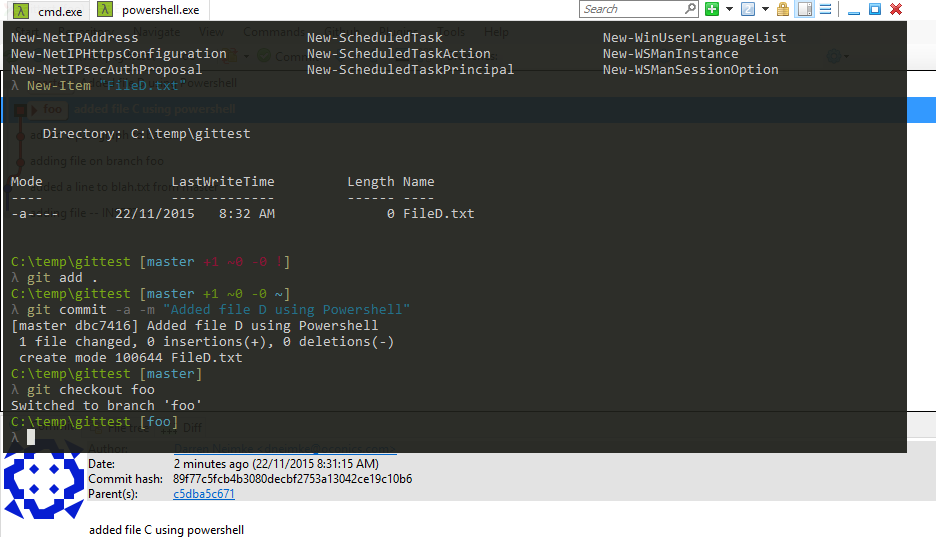
For my task today I decided to initialize a Git repository, add a file, make changes to the file, and commit those files to a Git branch all from the command line.  I wanted to use Powershell to create the project folder and the initial file so that I could tick my "One thing per day" goal of using PS for something at least once per day!

I found the New-Item (alias: ni) cmdlet which allows you to create a variety of item types.  To create a new folder, give it the -ItemType of 'directory' and then the name of the folder that you wish to create.  E.g.

> New-Item -ItemType directory myNewDirectory

I then went ahead and used Git to initialize a repo in the new folder:

> git init

New-Item can also be used to create files, just give it the name of the file that you want to create:

> ni "file1.txt"
> notepad "file1.txt"

This adds a new file named file1.txt and opens it in Notepad.

> git add .
> git commit -a -m "Adding file1.txt"

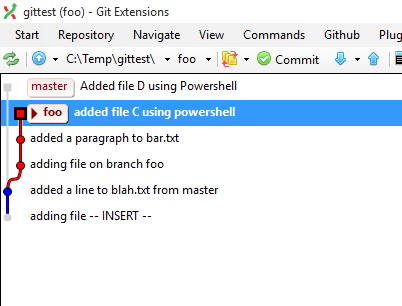
This will commit the changes of to your Git repo.  It's easy to visualize what's happening in Git Extensions:


The folder can be opened using VS Code using code and a dot "." to open the folder that you are currently in:

> code .

After playing around with Git for a while, I wanted to delete my test folder so I typed Remove- and pressed CTRL-SPACE to find out if Powershell had a Remove-Item command


And sure enough it did.  So I finished with the following PS command to blow away my test folder:

> rm "\testdir" -force

What I Learned:

  • When using cmder, I can start typing the name of a command and then use CTRL+SPACE to find all matching cmdlets

Friday, November 20, 2015

Doing 1 thing each day using Powershell

While at Ignite on the Gold Coast this week, it became very obvious to me that there are some really key technologies that I need to be across.  Watching people develop code and seeing them zip around using the Command line and various package managers highlighted where things are at with the developer workflow.

Technologies that I have committed to being across are:
  • Yeoman
  • Powershell
  • Git
  • Grunt/Gulp
  • Chocolatey
  • Visual Studio Team Services
To ensure that I remain curious and stay on track, I'm going to try and do one thing with Powershell each day.  Today's task is…

Delete project.lock.json files from a solution
This was a bigger issue in the past than it seems to be now, but I found that I regularly needed to manually delete the DNX lock files that were being generated by dnu.

The final product:

gci "\repos\dneimke\EF7Demo.CoffeeStore\*" -include "project.lock.json" -recurse | foreach($​_) {rm $ _​.fullname}

What I Learned:
  • The Get-Help cmdlet is a great resource for learning about how other cmdlets work
  • Get-Alias lists the aliases for all cmdlets
  • Get-ChildItem takes a -Path which makes it easy to list items in a folder - e.g. Get-ChildItem -Path \repos\test
  • Include seems to be the better way to target a specific pattern of file rather than -Filter

Resources:

Wednesday, November 18, 2015

Getting Started with EF7 - Adding EF7 to a new Project

While on the Gold Coast at Ignite, I presented on the new version of Entity Framework (EF7) while my colleague Jon spoke about the broader topic of .NET vNext.

In my talk, I gave 4 demos:
  1. Walkthrough showing how to add EF7 to a new project
  2. Using SQL Profiler to show the queries that EF7 generates for various scenarios
  3. Adding Migrations and Seeding to your application
  4. Using the new InMemoryProvider to easily unit test code that depends on EF7 data contexts
For the first demo I really wanted to show how simple it is to get started with EF7 and how the new component architecture works with respect to Nuget packaging.

For my first demo, I started off by creating a new Console Application (Package) project from the Web Templates.


The Solution must be configured so that the runtime version is aligned with a runtime that you have installed and Nuget is knows which Package Source contains the versions of the dependencies that you want to use.

To find which runtime versions you are installed on your machine, use the DNVM list command:


This shows that my machine is currently configured to use the 1.0.0-rc2-16183 clr x64 runtime, so the first thing I do is to change the global.json solution file to match.

{
  "projects": [ "src", "test" ],
  "sdk": {
    "version": "1.0.0-rc2-16183"
  }
}

Nuget needs to know where to look when it restores packages.  This can be done by adding it in the Nuget.Config file.

In this case the ASPNETCIDev source which is hosted on MyGet is where I want to get the EF packages from as contains the most recent packages from the ASPNET daily CI build process.

<?xml version="1.0" encoding="utf-8"?>
<configuration>
  <packageSources>
    <clear />
    <add key="api.nuget.org" value="https://api.nuget.org/v3/index.json" />
    <add key="aspnetcidev" value="https://www.myget.org/F/aspnetcidev/api/v3/index.json" />
  
</configuration>

The last thing to do is to add references for the EF7 dependencies that I need. I this case I'm after the following 3 packages:

  1. EntityFramework.Core: Contains core logic for DbSets, DbContexts, DataAnnotations, Querying, ChangeTracking, and Configuration among other things. 
  2. EntityFramework.Commands: A set of commands that can be used to create Migrations, Update Databases, and to scaffold an application from an existing database.
  3. EntityFramework.MicrosoftSqlServer: A database provider for using EF against a Microsoft SQL Server database.

Each of these packages represent a single project in the EntityFramework repository which is available to view in this GitHub repository.

"dependencies": {
  "EntityFramework.Core": "7.0.0-*",
  "EntityFramework.Commands": "7.0.0-*",
  "EntityFramework.MicrosoftSqlServer": "7.0.0-*"
},
 
"commands": {
  "ConsoleApp10": "ConsoleApp10",
  "ef": "EntityFramework.Commands"
},

The "ef" command which is added to the project commands can be used to run the EF commands using DNX.

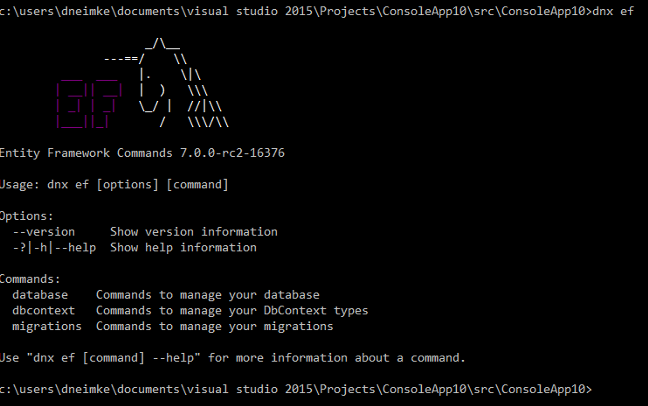
At this point, EF7 is configured and available to use. To test this, jump to the command line at the root of your project and type dnx ef. You should see the Magic Unicorn splash screen.


I finished the demo by creating a simple DbContext which contained a  couple of DbSet entities and created a Migration  using the EntityFramework Commands so that I could start working against a database.

What I hoped to achieve through this demo was to show the configuration points and how they connect the application to its environment and dependencies.

It is important to take note of the benefits that are achieved from the EF7 'ground up' rewrite which has delivered multiple, lightweight packages which empowers application developers to take only what they need in terms of dependencies.  Don't need Commands?  Simple, don't take that dependency!  Over time, this will enable more rapid innovation from Microsoft's end and increase flexibility and performance on the applications side.

If you are interested in taking a look at the sample code from my demos, you can find it in this GitHub repository.


Sunday, July 14, 2013

Problem trying to run a Web Application using Visual Studio 2013 Preview


I'm putting this here in the hope of saving some other poor soul the hour I lost this afternoon while playing around with a fresh Visual Studio 2013 Preview installation (Visual Studio Version 12).

I created a new Web Application (MVC Template) and pressed F5 to start it in debug mode.

Launch a new web application from within Visual Studio
 I was immediately presented with the following error dialog from within Visual Studio.

Microsoft Visual Studio.  
Process with an Id of xxxx is not running. 


I also saw the following text in my debug console window: The program '[xxxx] iisexpress.exe' has exited with code 0 (0x0)

The problem turned out to be an incorrect configuration for an IIS Express application pool setting which I found in my \users{your username}\mydocuments\IISexpress\config applicationhost.config configuration file.

The managedRuntimeVersion was mis-configured by default
I needed to change the framework version for the default app pool to match the current framework version that is installed for .NET 4.  In my case, that meant changing the version to v4.0.30319.


Thursday, September 13, 2012

How to Use Google Plus Circles

A common question I hear is "How can I get value from Circles in Google+" so I thought I'd list a few ways that I find them helpful.   Firstly here's an image that shows what my Circle strategy looks like:


As you can see, I don't have hundreds of Circles - although I wouldn't necessarily be opposed to having that many either.  Here are my top 5 reasons for using Circles:

Privacy
An obvious initial reason for segregating users into Circles is to limit the scope of information that you share.  Again, this is a key driver behind my [Colleagues] and [Family] Circles.  Having the ability to post information directly to those groups allows me to limit information from being seen by people that it might not be relevant for.  

Example: I'm at the beach and I use my mobile phone to take some photos.  When I get home, the photos are instantly sync'd with my G+ account as soon as my phone hits the Wifi.  From there it's just a couple of clicks to share those photos with my family members by posting them to the [Family] Circle.

Noise filtering
I know how frustrated I feel when I see other people clogging up my feed with their own personal interests (e.g. excessive posts about cats) and so, I believe that it is really important to be aware of and manage to the amount of "noise" that I emit to other individuals.  

Example: I'm confident my [Hockey] friends don't mind me posting several updates a day about hockey related stuff (e.g. pictures, embedded YouTube video's, etc.).  However add that up with my [Developer Community] related posts, and a few other general posts and suddenly I'm at risk of having people de-circle me because I'm too noisy.  

Having a [Hockey] circle allows me to post hockey-specific stuff to just those members and thus reduces the amount of "noise" that I'm sending to people with no interest in hockey whatsoever.

Tip: A neat feature is [Your Circles].  [Your Circles] is one step back from [Public] and allows you to easily share information with the widest scoped audience.  In Settings you can manage how wide that scope is by managing which Circles are included in the [Your Circles] scope:


Scanning
The Internet provides us with unlimited opportunities to access information, but managing the signal to noise level is a constant challenge.  [News and Information] and [Tech News] are Circles where I've add lots of providers and therefore receive a great deal of information.  To deal with the resultant "noise", I then tune the volume of information I receive from them in my main feed by using the following tools.  

Tune the amount of information displayed in the main feed

Click on filters to display all items for a given Circle

Drag Circles to change their order so that most common ones are displayed first


Search and Organize
In addition to the above mentioned benefits, posting to Circles acts as a way of grouping so that content can  easily be found later from among the masses of other posted content.  

Example: Although I may not remember the exact content of something posted, I may be able to find it by recalling that it was [Hockey] related.  Given that knowledge I could filter my main feed by the [Hockey] Circle and then scroll through the reduced amount of information to locate a post I'm after.

Integration across the Google landscape of products 
Given the integration of G+ across the Google sphere of products, it shouldn't come as a surprise that your investment Circles can be leveraged in other applications.  

Example: Circles flow through into Gmail, and therefore provide a useful way to find and organize communication from contacts by filtering based on the Circles they belong to.  This is a key driver behind having my [Hockey], [Family], and [Business] Circles.


Sunday, September 9, 2012

Getting started with using Pub on Windows – The Dart Package Manager

The Dart language is a thriving community that is growing and with it come the tools that assist with doing modern development.  One of the key tools that define modern development is a package manager and with Dart, the job of package management falls upon the Pub tool.  You can read an overview of the Pub tool on the Dartlang.org website.

A common question that I see in new groups is “How do I use pub on Windows?”.  In this article I’ll walk through using pub to help get the Dartsweeper application downloaded from GitHub and running on your machine. The basic steps that we are about to walk through are:

  • Install the Dart Editor on your machine
  • Install Git (distributed revision control and source code management (SCM) system)
  • Update some Windows Environment variables
  • Clone the Git source that we want
  • Run Pub to install dependencies
  • Run the application from within Dart Editor

OK, let’s get started

Get the Dart SDK

To get started, you need to have a few things in place on your machine.  The first thing is to ensure you have the Dart SDK.  The best way to get that is to download the Dart Editor which contains the Dart SDK files.  You can get this from the Dart Editor Download Page.

Once you have downloaded the .zip file, simply unzip the files to a location on your local machine.  The pub tool ships with the Dart SDK and you can find it at the following location: dart-sdk\util\pub

Configure Windows Environment Variables

You’ll need to configure a couple of Windows environment variables which make it easier to work with the SDK tools.  First, add an environment called DART_SDK and point it at the root SDK folder in your unzipped Dart download.  Next, update your Windows System Path variable and add a path which points to the bin folder of the SDK folder:

image

The reason for pointing the Path variable at the bin folder is because that’s where the main tools that you will need to use are located.  The DART_SDK variable however needs to point at the root SDK folder because it is used to access SDK resources other than just the SDK bin tools alone – e.g. Libraries, Packages, and other Utilities.

Test that you have configured your environment variables correctly by opening a Windows Command Prompt and type ‘pub help’ and you should see Help text for the Pub tool displayed:

image

Install Git

Many of the packages that you will want to include will require Git to pull them down.  Pub itself has support for working with Git via native protocol handlers which can be declared within the pubspec configuration files.  To get Git, download the latest stable build from the Git website.

Test that you have Git correctly by opening a Windows Command Prompt and type ‘git –version’ and you should see the version number for your Git installation displayed:

image

Grab Dartsweeper from Git

Now that we have all of our tools installed, it’s simply a matter of using Git commands to fetch the Dartsweeper files and then we’ll use Pub to update all of its dependencies.

Open a Windows Command Prompt and change to a directory where you want to work from and type the following commands:

> mkdir %USERPROFILE%\dart
> cd %USERPROFILE%\dart
> git clone
https://github.com/kevmoo/sweeper.dart.git
> cd sweeper.dart
> pub install

This will make a folder under your user profile called Dart and then clone the contents of Dartsweeper repo on GitHub into it.  Finally we run the pub install command from within the newly downloaded Dartsweeper folder.

Here you can see the result of running those commands in real time:

image

Running Dartsweeper

Now that we have Dartsweeper installed, it’s time to open it up in the Dart Editor and run it.  Open Dart Editor and open the sweeper.dart folder that we just grabbed from GitHub.

image

When you first open the application in Dart Editor, you will notice some red crosses against folders which indicate compiler errors:

image

The reason for this is that, currently in the Dart Editor, we need set the location for the packages on a per application basis.  In this case, we simply need to open Tools|Preferences and change the location that we want the compiler to look in for packages for this application.

image

After doing that, you can right-click on the test folder and exclude it by choosing Don’t Analyze to remove it from the compilation analysis process.  That should remove the remaining compiler error warning.

Now press Ctrl+R (or hit the Run button) to run the application in the Dartium build of Chrome:

image

Friday, September 7, 2012

BingItOn

imageBingItOn.com is another wasteful exercise by the Microsoft Bing team which attempts to con users into believing that its results are superior to those of Google’s Search product. 

I remember travelling to Seattle 5 or 6 years ago and seeing this tool used internally at Redmond - now finally it appears that the mighty Redmond marketing machine has unleashed it upon the public at large.

The premise of this tool is that you run a search and two sets of results are returned - one from Bing and one from Google.  You are then asked to make a choice about which set of results is more useful.

There are two problems here.  First, Microsoft simply needs to turn its back on some of these old Ballmer fights and look instead to the future.  Get back to innovating and delighting customers and walk away from this sort of stuff.  They really don't need to fight meaningless fights just because Ballmer made some dumb promise all those years ago.

Second, how relevant is it to make a choice when you strip away the added value pieces that Google delivers to me in a normal search?  Things such as personalized search results and added context through their knowledge graph enhancements.   For example, when I run a search using the Microsoft BingItOn tool for AFL Football legend “Buddy Franklin”, I receive two walls of results:

image

Picking through them both to find a winner is tough and quite subjective.  But let’s see how the results actually appear when I do the search on the actual site’s:

First I use Google and we can see that the results which are presented are far more useful than what is simply presented in the BingItOn tool.  I’m given personalized results which are more engaging, presented better, and which have added context and knowledge about the topic.

image

Contrast that with a search on Bing.com and we can see Bing doesn’t actually make it much easier than the BingItOn tool:

image

Less engaging, less relevant, and potentially a lot more work to do on my behalf to get a result that I might be interested in.

Here I repeat the result by searching for the term “Adelaide Crows Players” and let’s look at the results:

Google presents me with a scrollable list of the current players with their playing positions at the head of the SERP.

image

With Bing on the other hand, it appears that the first half dozen results might even be advertisements:

image

Yet run it in the BingItOn tool and the results are far less clear:

image

So the message that I take away from the BingItOn tool is this... if we strip away all the stuff that makes Google search great and dumb it down to a certain level, which search engine do you prefer.  It's not even a valid question to ask!

Tuesday, August 21, 2012

Are our words really wasted?


Scott Hanselman told us that our words are wasted, and then went on to ask how his post was controversial?  Well...

  • He said that my words are wasted?
  • He told me that I'm not blogging enough?
  • He implied that Google and Facebook will SURELY fail?
So, perhaps there is a bit of controversy there :)

It's not like I don't agree with Scott on a number of points.  I've hosted my own blog in the past and even written my own blogging platform.  In terms of portability, I created BlogML to help allow people to move from service to service.  And regardless, controversy is not such a bad thing.  I just don't think that the article was his best piece of writing (I hold him to a much higher standard than I hold myself :)  One point I have trouble with in the post is the list of things that we apparently find ourselves asking over and over again:

AttributeG+FacebookLiveOther?
Is a free or cheap social network for the people?????
Let's me control my content?????
Allows export of everything ?????
Allows me to own what I type?????
Has an open API for my content?????
Allows search posts over a month old?????
Limits available usernames?????
Allows me to be 'verified'?????

Is that the full list of 'product attributes' or is it constantly changing.  And how do you find a single product which meets those needs while also staying current with constantly changing expanding list of product features that users need.  And what is the cost of meeting those needs with any single boxed product?

The current state of software services is such a moving target and I'm continually rethinking how I use my journal to link it with and help my daily activities.  That includes things such as being able to link activities by location, having content delivered to whatever device I'm on, sharing stuff easily through a variety of ways, embedding rich content such as maps and documents through to having a variety of different privacy and sharing options.

I feel like I'm trying stuff out to help improve my life's process flow.

So I tend to focus on the benefits of that I get from "renting" an existing service and not so much on the fact that some greedy NASDAQ listed company is making money from my effort.  Those benefits include:

  • I get a fancier "apartment" :)
  • There are often added perks over the choices I have otherwise
  • I get to share costs/overheads with multiple tenants
  • It is generally cheaper and easier to relocate
  • Boring maintenance work is often removed
  • For me, I believe that there are reduced risks

So, as with most things in life, there are choices and trade-offs.

Tuesday, August 14, 2012

Constructors in Dart

Recently I've started using the Dart language and tools to maintain my interest in programming.  Coming from a .NET and JavaScript background, many of the features of the language are familiar to me but there are also some syntactical aspects that I like and which are particular to Dart.

One of the areas within the language that I'm enjoying is the constructor syntax.

Simple and default constructors
Every class will have a default constructor which is provided in case you don't specify your own.  To specify your own constructor, simply create a method with the same name as the class.

class WordContainer
{
  List _wordList;
  
  WordContainer(List words)
  {
    _wordList = words;
  }
  
  void Print()
  {
    _wordList.forEach((word) => print(word));
  }
}

In the above example, as you might expect, we have a simple constructor which allows us to construct new instances the class by passing in a list of words:


Assignment of constructor arguments to member variables
A handy shortcut exists in the Dart language for assigning constructor arguments to member variables which can save keystrokes and time.

class Point
{
  num x, y;
  
  Point(this.x, this.y);
}

Named constructors and default parameters
Another nice feature of Dart is the named constructor syntax which is designed to make it easier to identify the purpose for different constructor overloads.  In the following example I have created a separate, named constructor which takes a single word and provides an optional parameter to specify the number of times to add the single word to the word list.  To differentiate the purpose of this constructor method, I will give it a unique name.

class WordContainer
{
  List _wordList;
  
  WordContainer.fromSingleWord(String word, [num times = 10])
  {
    _wordList = [];
    
    for(var i = 0; i < times; i++)
    {
      _wordList.add(word);
    }
  }
}

When calling the overloaded constructor method, it now becomes more readily apparent as to what is happening from where the code is called:

Saturday, March 17, 2012

Serialization ordering causes problems when using DataContactSerializer in WCF services

Have you ever created a WCF service and, when you’ve called it from a consuming application, some values appeared to come through just fine while other values were ignored?  Perhaps you’ve been stung by the default ordering rules that are applied when using the DataContractSerializer (the default choice in WCF).

First up, if you are not aware of how serialization in WCF works, here is a link to a good Msdn article which compares some of the differences between the various serialization techniques that are on offer in WCF: http://msdn.microsoft.com/en-us/magazine/cc163569.aspx

A big issue is the fact that the DataContractSerializer works on the order in which it expects to receive fields in the incoming messages. This can cause some very unexpected behaviour.

To describe the issue, we will first create a data contract to model an incoming message. The contract that we are modelling here contains 4 properties, 3 of which are Integers, and the other is an Enum value (not that that's significant).

The Data Contract
clip_image001

Next we create a simple service to receive our message and to do some processing over it. In this case we will receive the message and then simply write out the values that have been set by the deserialization process.

A Simple Serviceclip_image002

When using the DataContractSerializer to handle serialization in your web service, it is important to understand the default ordering rules that it uses and what that means in terms of the order in which elements are expected to appear.

Given our fairly simple type above, the main rule that we need to be aware of is that the properties are expected to be ordered alphabetically. If we obey that rule, then the results of our message processing work out just fine.

Default Ordering – OK
clip_image003

However look at what happens if we change the order of the elements in our request message.

Changed Ordering - Errorclip_image004

In this case, the DataContractSerializer has skipped the elements that were not found in the correct order and then moved on to processing the next element. This can have some pretty disastrous consequences because, not only is the data skipped for the elements that were out of order, but the corresponding properties now have incorrect values set for them!

Use the XmlSerializer

The default ordering issue is probably not a big deal if you are in a pure .NET environment and you have WCF at both ends of the communication. But how often does that happen these days? In our environment at work it is typical to have all types of clients that want to connect to our service - Classic ASP, Client Side Web Pages, and External Vendor applications.

In each of these scenarios, it is likely that the consumer of the service will craft the messages in such a manner that it is difficult to enforce and verify that the correct order is always obeyed. And the resulting bugs may not get picked up unless you have a very sophisticated and well disciplined UAT process!

A solution to this problem is to configure your service to use the XmlSerializer approach which has been around since the early days of .NET. This is achieved by simply annotating your service contract with an attribute to tell WCF that you want to override the default serialization technique.

Overriding the default serialization technique

clip_image005

Once we do this, elements can appear in any order because of how the XmlSerializer uses names to do element mapping.

clip_image006

The downsides of using the XmlSerializer are:

  • Using the XmlSerializer incurs additional performance costs because it generates strongly typed assemblies for the classes that are subject to the serialization process. However this can be avoided by pre-generating the assemblies that you need using the SGen tool.
  • DataContactSerializer has some additional attributes (Order and IsRequired) that can help with certain versioning scenarios.

The benefits or using XmlSerializer are:

  • Get around the ordering issues which results in less fragility in consuming applications.
  • Ability to easily work with Xml attributes as part of the serialization mapping on .NET types can aid interoperability and makes it easier to adopt a “contract first” approach to service implementation

Thursday, March 1, 2012

Article Stack 2nd March 2012

Capturing AUDIO & VIDEO in HTML5

http://www.html5rocks.com/en/tutorials/getusermedia/intro/

A good introduction to getUserMedia in modern browsers which allows you to capture video and audio and to optionally stream their captured output to HTML5 audio and video elements. This is available in Chrome by enabling MediaStream in chrome://flags/

Nobody Understands REST or HTTP

http://blog.steveklabnik.com/posts/2011-07-03-nobody-understands-rest-or-http

Another article which explains REST/HTTP stuff. There's some stuff in here about versioning using an Accepts HTTP Header value. There's a lot of good stuff in here and I'd love to have the time to prototype some of these concepts using ASP.NET Web API as a sample technology.


ASP.NET Web API Articles

Speaking of Web API, there's heaps of good content about it coming out now on a daily basis in blogs. Here's links to some good articles that I've read recently about Web API:

  • Introductory walk through of an end to end sample by Scott Hanselman - [link]. Note: I loved the use of MvcScaffolding and Nuget here. I hadn't seen that before but it looks pretty useful for prototyping stuff quickly, particularly when you are going against a database.
  • A two part series of articles which explains how Content Negotiation works in Web API [part 1], [part 2]
  • Controller names for Web API controllers, the rules that they conform to, and the extensibility points for customizing the selection of controllers [link]


Scott Hanselman about The New Visual Studio Look and Feel

http://www.hanselman.com/blog/ChangeConsideredHarmfulTheNewVisualStudioLookAndFeel.aspx

Version 11 of Visual Studio is out and it has had a significant update to its look and feel. I think Scott nails it here and I believe that many people's first impression will be to say that they don't like it - change often hurts. In looking at the screenshots in Scott's post I actually quite like the new look. Scott also has some great tips for getting a better theme and for streamlining the look by reducing buttons and toolbars.


WinJS Observables

http://stephenwalther.com/blog/archive/2012/02/25/windows-web-applications-understanding-observables.aspx

Finally, there's also been a new release of Windows 8 this week so it's timely to get an article from Stephen Walther about how Observables work in the WinJS Binding library.

Sunday, January 29, 2012

My experience in updating to Bootstrap V2

Over the weekend I updated SkillsLibrary to use the newer version of Bootstrap from Twitter. You can see the new version which is running on AppHarbour (which I’m using as my UAT environment) http://skillslibrary.apphb.com/ and compare it to the older version running in production: http://skillslibrary.net/.

Bootstrap V2 is going to be released on 31st Jan. 2012 and you can read about the changes from the official source here.

In this article I’ll go through some of my own personal experience in terms of upgrading.

Configurable Download

From the outset, the Bootstrap team have improved the deployment of this resource by allowing you to configure your download and receive it as two single CSS and JS files.

The first thing to notice as an unauthenticated user is that I’ve removed the “Hero Unit” from the home page and replaced it with smaller title text and a carousel of images.  Part of the reason for that change was that, the previous version of Bootstrap had a Hero Unit CSS class which has not been carried forward:

image

Home Page Carousel

Another reason was that I had always planned to implement a carousel of images and now that it’s a core component in Bootstrap, it seemed like a good time to make that change:

image

Most of the other changes are not visible until you log in although there were some other smaller tweaks that I had to make across the site to accommodate the new base styles.

Re-styled Forms

The most significant site-wide change involved updating the layout of forms and their controls to match the new V2 component styling.  Forms in V1 were really nice but the semantics have been significantly improved in V2.  The following image highlights some of the differences that I made to upgrade the Registration form:

image

You can see that the rows in the form have had their class name changed from clearfix to the more semantically sensible name of control-group.  Likewise, the area at the bottom of the form has changed from actions to form-actions and labels now have a class name to distinguish them.  There were other changes as well, but these were the ones that I had to make to all of my forms.

Navigation

When you log in to the application, there are lots of changes that become apparent, starting with the Global Navbar.  The following image compares the previous version with the current one:

image

From a purely visual perspective, you can see that the Search box has altered to display more rounded corners and that the dropdown menu’s have received a significant upgrade to their appearance.  But the HTML semantics have also changed but have remained very simple. 

One thing that I have not yet implemented as yet, but which I will definitely be doing is to make use of the sprite images that have been bundled with Bootstrap to make my menu’s and buttons look much snazzier!  Using those sprite images makes it easy to achieve results such as this with the ‘out of the box’ experience:

image

Split Button Dropdowns

A key improvement for SkillsLibrary was the introduction of the new Button Dropdowns which have been introduced.  Prior to these I had hacked together a rough user experience for performing additional actions against Activities by using the V1 dropdowns but now they have bundled them to create a beautiful Split Button Dropdown experience:

image

It’s lots of little things such as this which have really tightened up the user interface a lot.

Dialogs

Probably the other major UX feature that I implemented was the Modal Dialogs.

image

These existed in the V1 version of Bootstrap but have again been improved to include enhancements such as dark background when the modal is displayed and cleaner styling and semantic HTML options for closing the dialogs.

Other

There were several other smaller changes to styles and HTML syntax.  Some of the component class names changed and other components have had improved UI.  One of these was the popover controls which now make it easier to display a prominent title and description text as a single component.

image

Conclusion

SkillsLibrary is a moderately complex web application with about 30-40 pages.  All up, it took me about 4 hours to upgrade from V1 to V2 of Bootstrap.  Having done so I feel very satisfied that the UX improvements that I’ve discussed in this article have made it worthwhile but I also feel happy that implementing further components (such as the Typeahead and Collapse) controls will allow me to reduce my overall 3rd party JS dependencies.